Project Sunshine, Part 2: The Metal
2025-09-22
The wired ethernet I wrote about in part 1 of Project Sunshine is working wonderfully. Laura just told me she’s never before seen an OS update download so quickly. With that infrastructure in place, it’s time to move onto the next critical part of de-clouding my life: actually getting a server. At the project kick-off, I knew a few things already:
- I want to build it myself. None of this off-the-shelf NAS nonsense, I’m a computer person and I shall be building my own for this. Partially because this is my digital sovereignty project and I shall stand on principle, but mostly because I can meet my needs better with something custom, and also a little bit because I like building computers.
- I demand silence. This thing will be at low but steady load most of the time, and at that load, I really want it to not be a nuisance. I live in an apartment, so it’s not an option to leave something noisy in a basement.
- I hate power bills and love the planet. I want it to sip power! There will be at least an entire post about making this server as efficient as I can, but out of the gates I want to be deliberate with my component selection to maximise efficiency.
- I am planning to stream media, which means I need graphics. I ruled out discrete GPUs pretty early, and all the Jellyfin and Plex docs advise against AMD Ryzen processors. Apparently, Intel’s Quick Sync technology is a bit of a moat.
- I really want something that will do better for me in this role than a Mac Mini. This is a tall order! That thing is incredible. I’ll talk about this more a bit later.
With all of these things in mind, I set about planning out a build. While there are some newer cases out there for storage focused PC builds, the venerable Fractal Design Node 304 won out. I had also considered its larger cousin the Node 804. That case is awesome, but it has a much larger footprint, and comes with features that I don’t need. It’s still worth it, even factoring in the ITX tax.
This case fits six 3.5” hard drives in it, which is very exciting considering I haven’t owned a hard drive since 2013. This much storage gives me a lot of options, broadly in two dimensions: drive selection, and drive configuration. The latter is going to be its own post a bit later on. This post is just about hardware.
Drive Selection
Hard drives aren’t just higher capacity than SSDs, they are also considerably cheaper in $/TB, and will even outlast SSDs on a lot of workloads. That’s about what I knew coming into this, but it turns out there was a lot more knowledge coming my way. My decision-making regarding hard drives was primarily along three axes: sound, power consumption, and reliability. Alongside that, I also care about the price and the speed. The capacity is almost an orthogonal choice here: most hard drive lines come in a range of capacities, so that is something I can choose according to my needs. I very quickly learned that ordinary consumer hard drives were not going to fit my bill. For the kinds of things I’m planning, I will need NAS grade drives. I also learned that I want to make sure that they use CMR recording technology rather than the cheaper and denser SMR. SMR (Shingled Magnetic Recording) was introduced only a decade or so ago, and allows more data to be stored on a platter, but their design entails lower write speeds that all but entirely precludes doing anything with ZFS or RAID. Luckily for me, drives marketed as NAS grade almost entirely use CMR. There was a scandal about SMR drives being poorly labelled and shoved into existing NAS lines a few years ago, a scandal from which I can now benefit, because this information was easy to find.
It was harder to find information about another innovation in spinning rust drives over the last decade: helium filling. By hermetically sealing drives and filling them with helium, you can get some pretty serious efficiency savings, as well as better acoustic performance. As best I could tell, this was first sold in 2013, making it the second cool new thing that’s happened in this space since I last owned a hard drive. Unlike the recording technology, this is a lot harder to find on a product page. I had to go trawling through vendor data sheets to find this out, which is exactly what I did. Looking at the Seagate Ironwolf line, one can see that their 10TB drives are helium-filled, while their 8TB drives use air. This results in a 2.6W drop in idle power consumption, as well as a 10dB drop in idle sound. I cross-checked this with a few other vendors while comparison shopping, and this was pretty consistently the difference.
After a lot of comparison and looking around, I decided that the WD Red Plus line was probably best for me. The drives are quiet, power efficient, perfect for my needs. The only one in that line that is helium-filled is 12TB. That is honestly a little bit silly, but it does mean I can get away with two of them, rather than four or even more. It is also only one of the WD Red Plus 12TB drives that is helium-filled, since they have an air-filled model too. I needed to be very careful in buying WD120EFBX and not WD120EFGX.
Was I very careful? I’m sorry to report that I was not. I accidentally bought drives with the serial number WD122KFBX. These are 12TB WD Pro drives. Relative to Plus, Pro is more enterprise-focused, meaning that the drives are more reliable, support higher write volume, are faster, and are of course more expensive. I could have lived with this, except that that model is also air-filled. After taking a look at the data sheet again, I decided to RMA them and replaced them with the equivalent helium-filled drives: WD121KFBX.
Keen-eyed readers will note that that product code is different from the one I mentioned above. In my excitement to have found helium-filled drives, I did not note that I was still looking at WD Red Pro, rather than the WD Red Plus that I was actually aiming for. I didn’t notice this until I wrote this section and found the disagreement between SKUs. I am extremely embarrassed about this whole debacle. In short, buying hard drives is an absolute minefield and you should be very careful. Consult vendor data sheets, and paste SKUs into Newegg or something. Don’t rely on websites having good search features, because they don’t surface all the information one might care about, and it’s very easy to get confused between similarly named brands. Having said that, I do feel like I can fairly confidently recommend the WD120EFBX if you have a use case similar to mine.
While I am excited to find all sorts of ways to use the staggering capacities of modern 3.5” hard drives, I don’t want to rely on them all the time. Even the most demure hard drives are relatively noisy and energy intensive, so I want to use them as little as possible, and I certainly don’t want to boot off them. I am pairing these hard drives with a 1TB NVMe SSD. It is a PCIe Gen 4 drive, which is blazing fast compared to my hard drives. However, I may pin it to Gen 3 if that gives a meaningful power saving. I’m not sure yet, and making this thing as efficient as possible is going to be a future task. I went with the Crucial T500 line, which are well-reviewed but otherwise unremarkable.
Other Components
My first choice processor was the Intel 12400. This is an older midrange CPU with integrated graphics. It’s got great performance for the things I want it to do, with a modern enough stack that I can transcode movies all day long. Unfortunately, my ITX choices came calling, because I just couldn’t find a mini-ITX motherboard for the LGA1700 socket. Not at a reasonable price, anyway.
This ended up pushing me to buy the brand new successor to this chip, skipping forward four whole generations to the Core Ultra 225. Intel rebranded their CPU lineup a couple of generations back, so the names are totally different, but as far as I can tell, this is the same tier of processor. I wasn’t able to find much in the way of reviews of this chip, but it’s a 10-core (6 performance and 4 efficiency) 65W CPU that should be no match for my cooling.
I’m reusing 64GB of DDR5 that I had lying around. This is outrageously overprovisioned for this server, but I had it lying around. I had it lying around as a consequence of my choice of CPU cooler. I decided to use the Noctua L12Sx77 that was previously in my desktop here. I needed to buy a new CPU cooler for this server, and I chose to reconfigure my gaming PC slightly by installing a smaller CPU cooler. This Noctua unit is great, but it requires that I configure my Terra in the maximum CPU side, which dramatically restricts my GPU options. That’s probably the first component I will upgrade in a few years time, and I figured that I may as well make room for that now. I landed on the ID Cooling IS-55 for this, which is great, but my existing RAM wouldn’t fit under it. I bought new RAM, and so now I have 64GB of 6400MT/s RAM I can use here.
Finally, I chose the Corsair RM650E power supply. This is laughably overpowered for what I need. I’ll be surprised if I ever reach 50% of its rated output. But it was reasonably priced, and posts pretty good efficiencies at very low power. Ideally, I would have been able to find a lower power unit, but high end low power PSUs are hard to come by these days.
With that, I’m ready to actually assemble this thing.
The Build
Overall, it was a delight to build in this case. I replaced the stock fans with their Noctua equivalents (2x92mm in the front and 1x140mm in the back). This will help with my ambitions for silence, but my main motivation here was aesthetics. I’m chucking some beige into this because I think it looks sick.
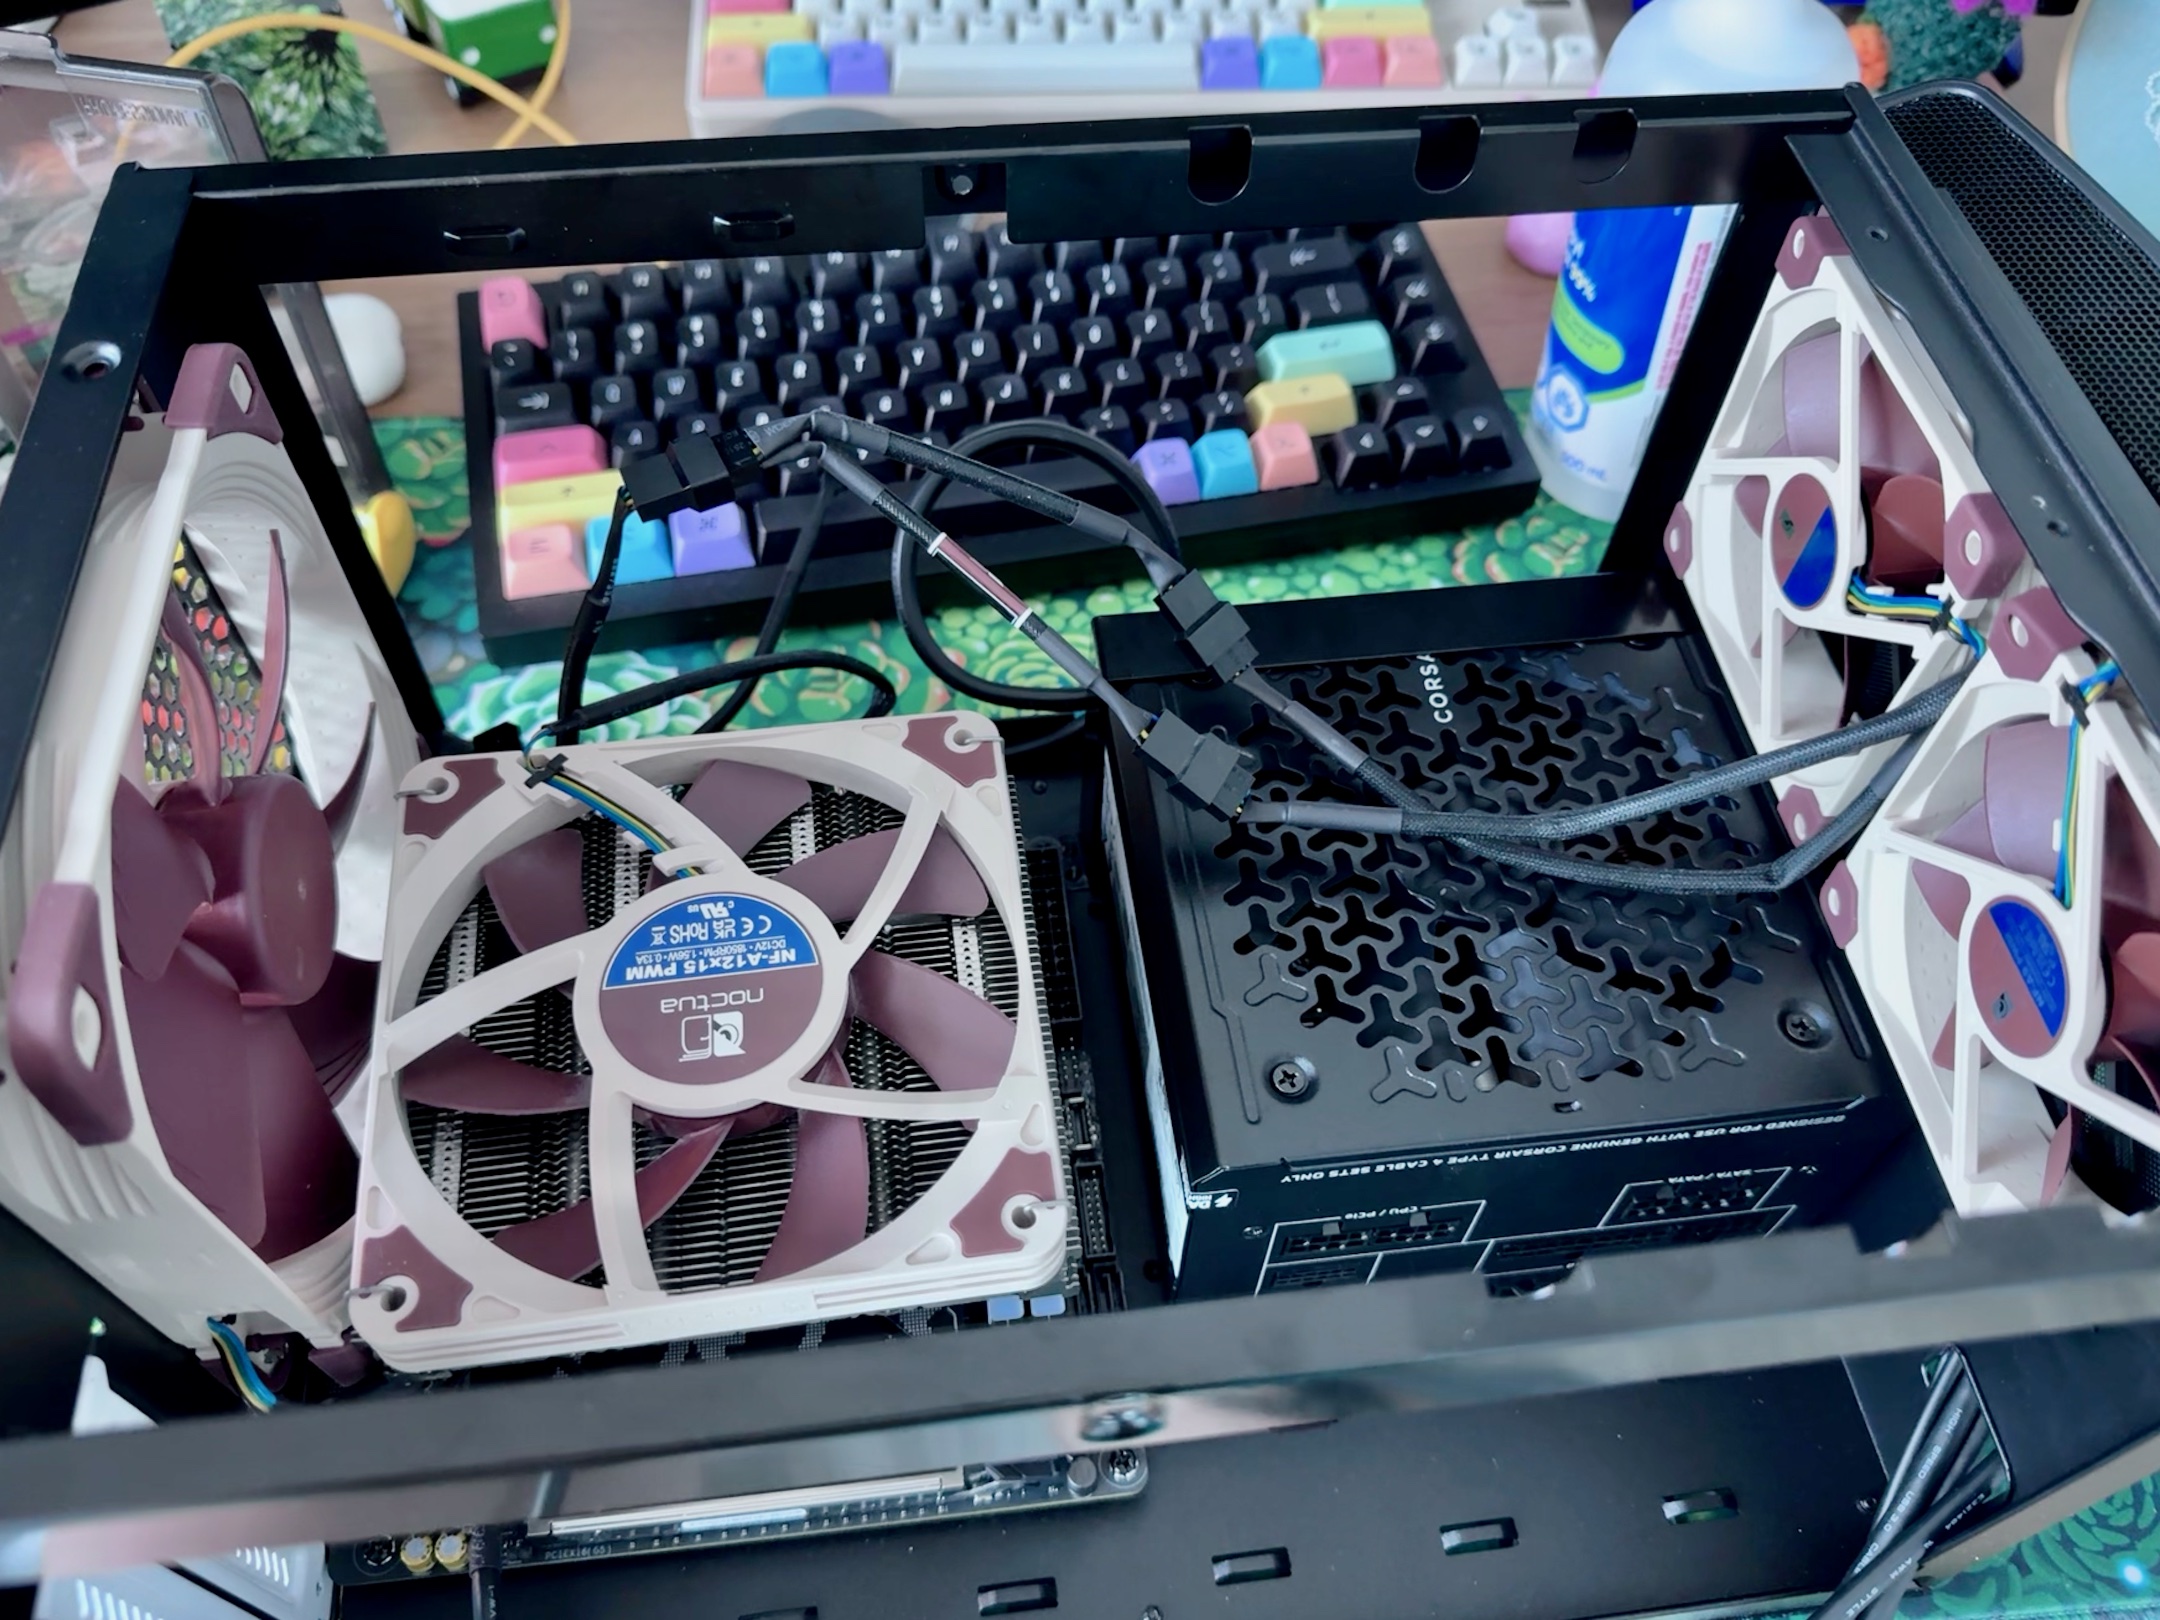
I removed the fan control daughterboard from the back. The stock case fans did not support PWM, but the Noctua replacements do, so running them off my motherboard gives me much better control here. My motherboard only has a single fan header, so I was left with a snarl of y-splitters, but it all worked great.
I did have to install the power supply upside-down. The way the extension cable came in just wasn’t going to work with how close the plug was to the front of the case. This was okay, though there is one less screw connecting the PSU to the bracket. It also means the power supply is exhausting air upwards rather than down and through the vent that is literally in the case for the PSU exhaust. I’m not too worried about this, because [a] as I said I doubt the fan will ever turn on, and [b] it’s blowing that air up into the airflow of the case from front to back.
Apart from those hiccoughs, this build was pretty easy.
After assembling the system, it posted first time, and I installed Fedora 42 Server. I’ll be discussing my choice of operating system in a future update.
Benchmarking
At idle, this thing is blissful. CPU core temperatures are a balmy 28ºC. But I wanted to see how this build scaled thermally and acoustically as load increases. I first ran stress-ng to see sustained CPU load. On a 100% all-cores workload, my temperatures maxed out at 58ºC or so, with which I was delighted. I’ve got thermal headroom here. I don’t know what — if anything — I might want to do with it yet, but it’s nice to have.
After verifying that my new server was at least well-built, I decided to try some actual benchmarks. The Phoronix test suite is a community-built dizzying array of benchmarks for exactly this purpose. After reading enough of the docs to be dangerous, I merrily went ahead and ran phoronix-test-suite benchmark pts/compilation. This is a suite that compiles a lot of popular open source projects. There are a couple of things I learned running these benchmarks:
- Use Tmux for things like this. I started it off without this while at a cafe. This was a huge mistake that I didn’t notice until an hour or so later when I wanted to leave. I had to start the process again.
- Compiling code is kind of broken. Using
make -j$(nproc)is not technically thread safe, so my benchmark runs would occasionally fail, and then succeed later. Phoronix will give up if it fails three times, but my GCC test failed twice before it got three successful runs.
With enough attempts and a tmux session, I did eventually get the compilation time test suite to run. If you’re super into it, you can check out the results on OpenBenchmarking. There’s not that much to see, though, as the results land about where I expected: a little faster than an Intel 12400, and a little slower than a Ryzen 9600X. More importantly for me, it was fast enough, very consistent (GCC took about 800s each time), and whisper quiet the entire time.
Did I Beat The Mac Mini?
Short answer: Of course I did!
Longer answer: there are a lot of workloads that a new Mac Mini would probably beat this PC at. I certainly think it would have a real good go at that Phoronix test suite, and it would likely do it with lower power consumption, too. But there are a few key ways that I’m happier where I am now than I would have been with a Mac Mini, and they’re why I chose to build this at all:
- I got to build it. This was a fun Max enrichment activity.
- It has space for built-in storage. For my purposes, I’d need an outboard hard drive enclosure, since Apple charges exorbitant prices for their storage upgrades.
- I can run whatever operating system I like.
If we spec up a Mac Mini, we need to make a few concessions to make it a fair fight. Apple gates 64GB of RAM behind the M4 Pro, and then they charge CA$900 above the base 24GB you get as standard. A Mac Mini with 32GB RAM and 1TB storage sets me back CA$1999. In addition to having less RAM, it also only has 1GbE out the back, which is a further downgrade from the 2.5Gbps LAN that I have previously written (at length) about installing.
On top of that, an external USB 3.2 Gen2 4-bay 3.5” HDD enclosure is listed at CA$249 on Amazon right now. So before we get to any hard drives, CA$2248, plus local taxes.
The total bill of materials for my components was:
- SSD: CA$144.99
- PSU: CA$124.99
- Case: CA$139.99
- CPU: CA$318.65
- Motherboard: CA$279.99
I did bring my own RAM and CPU Cooler, and upgraded the stock fans. The fans cost me CA$71.29. A set of 32GB RAM (to match the Mac) goes for about CA$140, and the CPU came with a cooler that you wouldn’t use, so let’s add CA$48.90 for the cooler I would have used instead.
All up we are looking at CA$1268.80. Relative to the Mac Mini, I’ve saved myself about a thousand bucks. This is not to lampoon Apple (though their prices for storage and memory are outrageous), that little computer is an excellent generalist. But I have a particular set of skills and a particular set of needs, and I love my little enthusiast-oriented server.